16 Irresistible Hand‑Held Desserts For Summer Picnics
Summer picnics call for sweet treats that are easy to enjoy on the go, and these 16 hand-held desserts are just the ticket. From flaky pastries to moist cakes, each recipe focuses on appealing textures and vibrant flavors that perfectly capture the essence of the season. You’ll discover delightful combinations like fresh berries and creamy fillings, crafted to satisfy your sweet tooth without the fuss of formal dining. Grab your favorite picnic blanket and get ready to whip up these simple yet delightful desserts that are sure to impress everyone at your next outdoor gathering.
1. Cherry Empanadillas

Cherry empanadillas are delightful little pastries that pack a burst of sweet cherry flavor in every bite. These hand-held treats are perfect for summer picnics, combining a flaky crust with a luscious cherry filling. They are simple to make, and the result is a crowd-pleaser that everyone will love.
With a light dusting of powdered sugar on top, these empanadillas not only taste great but also look beautiful on any picnic spread. Whether you enjoy them warm or at room temperature, they are sure to be a hit!
Ingredients
- 2 cups all-purpose flour
- 1/2 teaspoon salt
- 1/2 cup unsalted butter, chilled and diced
- 1/4 cup ice water
- 1 cup fresh cherries, pitted and halved
- 1/4 cup granulated sugar
- 1 tablespoon cornstarch
- 1 teaspoon vanilla extract
- 1 egg, beaten (for egg wash)
- Powdered sugar for dusting
Instructions
- Make the Dough: In a bowl, mix flour and salt. Cut in the butter until the mixture resembles coarse crumbs. Stir in ice water, a tablespoon at a time, until the dough comes together. Wrap in plastic wrap and refrigerate for 30 minutes.
- Prepare the Filling: In a saucepan, combine cherries, granulated sugar, cornstarch, and vanilla. Cook over medium heat until the mixture thickens, about 5 minutes. Remove from heat and let cool.
- Roll Out the Dough: On a floured surface, roll out the dough to about 1/8 inch thick. Cut into squares, about 4 inches on each side.
- Fill the Empanadillas: Place a spoonful of the cherry filling in the center of each square. Fold the dough over to form a triangle and seal the edges by pressing with a fork.
- Bake: Preheat the oven to 375°F (190°C). Place the empanadillas on a baking sheet lined with parchment paper. Brush with beaten egg. Bake for 20-25 minutes or until golden brown.
- Serve: Let cool slightly, then dust with powdered sugar before serving.
2. Red Velvet Cake Ice Cream Sandwiches

Red Velvet Cake Ice Cream Sandwiches are a delightful treat that combines the rich flavors of red velvet cake with creamy ice cream. These sandwiches are not only visually stunning with their vibrant red color, but they also offer a perfect balance of sweetness and a hint of cocoa. They’re a fun and easy dessert to whip up for summer picnics, making them a hit with both kids and adults alike.
Making these ice cream sandwiches is simple and straightforward. You’ll bake soft red velvet cookies, then sandwich your favorite ice cream in between. The result is a deliciously cool dessert that’s perfect for warm days. Enjoy these treats on a picnic blanket or as a sweet snack at home!
Ingredients
- 1 1/2 cups all-purpose flour
- 1 cup granulated sugar
- 1/2 cup unsweetened cocoa powder
- 1 teaspoon baking soda
- 1/2 teaspoon salt
- 1 cup vegetable oil
- 1 cup buttermilk, room temperature
- 2 large eggs
- 2 tablespoons red food coloring
- 1 teaspoon vanilla extract
- 1/2 teaspoon white vinegar
- 2 cups ice cream (any flavor you like)
Instructions
- Preheat your oven to 350°F (175°C) and line a baking sheet with parchment paper.
- In a large bowl, mix together the flour, sugar, cocoa powder, baking soda, and salt.
- In another bowl, whisk together the oil, buttermilk, eggs, food coloring, vanilla extract, and vinegar until well combined.
- Gradually add the wet ingredients to the dry ingredients, mixing until just combined.
- Drop spoonfuls of the batter onto the prepared baking sheet, spacing them about 2 inches apart.
- Bake for 10-12 minutes, or until the cookies are set and a toothpick comes out clean. Let them cool completely on a wire rack.
- Once cooled, take one cookie, add a scoop of ice cream on top, and place another cookie on top to create a sandwich. Press gently to secure.
- Repeat with the remaining cookies and ice cream. Serve immediately or freeze for later!
3. Classic Cannoli
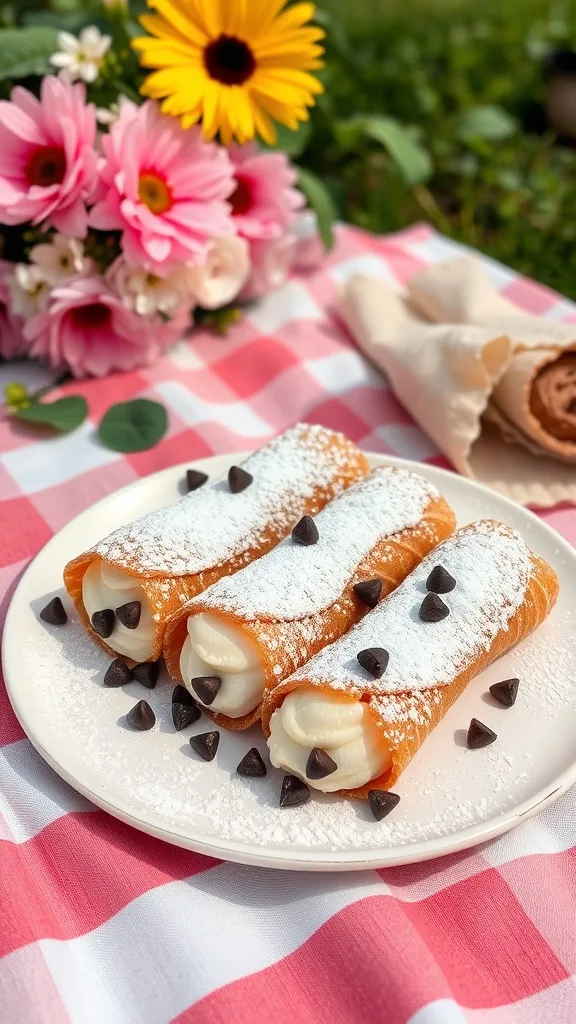
Cannoli are a delightful Italian treat that bring a taste of tradition to any picnic. With their crispy shells and creamy filling, they offer a perfect balance of textures and flavors. These hand-held desserts are not only delicious but also simple to make, making them a great choice for summer gatherings.
Each bite of a cannoli is a burst of sweetness, thanks to the rich ricotta filling and a hint of vanilla. Topped with chocolate chips and a dusting of powdered sugar, they are sure to impress your friends and family. Plus, they can be made ahead of time, so you can enjoy your picnic without any last-minute stress!
Ingredients
- 1 cup all-purpose flour
- 2 tablespoons granulated sugar
- 1/2 teaspoon cinnamon
- 1 tablespoon unsalted butter, softened
- 1 egg yolk
- 1/4 cup white wine or vinegar
- 1 cup ricotta cheese
- 1/2 cup powdered sugar
- 1 teaspoon vanilla extract
- 1/4 cup mini chocolate chips
- Oil for frying
- Powdered sugar for dusting
Instructions
- Make the Dough: In a bowl, mix flour, sugar, and cinnamon. Add butter and egg yolk, then gradually stir in the wine or vinegar until a dough forms. Knead until smooth, then wrap in plastic wrap and let it rest for 30 minutes.
- Roll and Cut: Roll out the dough thinly on a floured surface. Cut into circles (about 4 inches in diameter).
- Shape the Shells: Wrap each circle around a cannoli tube, sealing the edges with a bit of water. Heat oil in a deep pan and fry the shells until golden brown. Remove and let cool before gently sliding off the tubes.
- Prepare the Filling: In a bowl, mix ricotta, powdered sugar, and vanilla until smooth. Fold in chocolate chips.
- Fill the Shells: Use a piping bag to fill each cooled shell with the ricotta mixture. Dust with powdered sugar before serving.
4. Portuguese Pastéis De Nata

Portuguese Pastéis de Nata are delightful little custard tarts that bring a taste of Lisbon to your summer picnic. With a flaky, crispy crust and a creamy, sweet filling, these treats are perfect for satisfying your dessert cravings. They have a rich, caramelized top that adds a touch of elegance to any gathering.
Making Pastéis de Nata is simpler than you might think! With just a few ingredients, you can whip up a batch that will impress your friends and family. They are best served warm, making them a lovely addition to your picnic spread.
Ingredients
- 1 package of puff pastry (thawed)
- 1 cup whole milk
- 1/2 cup heavy cream
- 2/3 cup granulated sugar
- 3 large egg yolks
- 1 tablespoon cornstarch
- 1 teaspoon vanilla extract
- 1/4 teaspoon ground cinnamon
- Butter (for greasing the muffin tin)
Instructions
- Preheat your oven to 475°F (245°C). Grease a muffin tin with butter.
- Roll out the puff pastry on a floured surface and cut it into circles to fit the muffin tin. Press the pastry into each cup, making sure it covers the sides.
- In a saucepan, combine the milk, heavy cream, and sugar. Heat over medium until the sugar dissolves, then remove from heat.
- In a bowl, whisk together the egg yolks, cornstarch, vanilla extract, and cinnamon. Gradually add the warm milk mixture to the egg mixture, whisking constantly.
- Pour the custard mixture into the pastry-lined muffin cups, filling them about 3/4 full.
- Bake for 15-20 minutes, or until the tops are golden brown and slightly caramelized.
- Let them cool for a few minutes before removing from the tin. Serve warm and enjoy!
5. Pistachio Cookie Cups
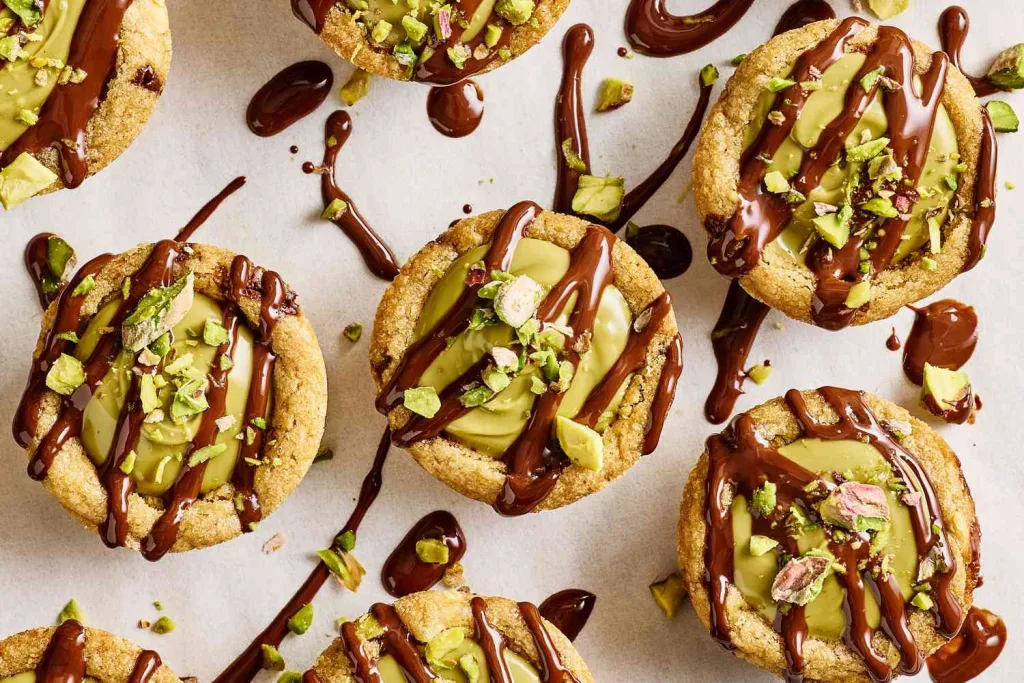
Pistachio cookie cups are a delightful treat that combines the nutty flavor of pistachios with a soft, buttery cookie base. Topped with a creamy frosting and a sprinkle of crushed pistachios, these little cups are perfect for summer picnics. They are easy to make, making them a great choice for both novice and experienced bakers.
These cookie cups are not only visually appealing but also offer a unique taste that will impress your friends and family. The combination of textures—from the crisp cookie to the smooth frosting—creates a satisfying bite. Plus, they are portable, making them an ideal hand-held dessert for outdoor gatherings.
Ingredients
- 1 cup unsalted butter, softened
- 3/4 cup granulated sugar
- 1/2 cup powdered sugar
- 1 large egg
- 1 teaspoon vanilla extract
- 2 cups all-purpose flour
- 1/2 teaspoon baking powder
- 1/4 teaspoon salt
- 1 cup finely chopped pistachios
- 1 cup cream cheese, softened
- 1/2 cup powdered sugar (for frosting)
- 1 teaspoon vanilla extract (for frosting)
- Extra chopped pistachios for topping
Instructions
- Preheat your oven to 350°F (175°C). Grease a mini muffin tin.
- In a large bowl, cream together the softened butter, granulated sugar, and powdered sugar until light and fluffy. Beat in the egg and vanilla extract.
- In another bowl, whisk together the flour, baking powder, and salt. Gradually add this to the butter mixture, mixing until just combined. Fold in the chopped pistachios.
- Scoop the dough into the prepared mini muffin tin, filling each cup about 2/3 full. Bake for 12-15 minutes or until the edges are lightly golden.
- Allow the cookie cups to cool in the pan for a few minutes before transferring them to a wire rack to cool completely.
- While the cups cool, prepare the frosting by beating together the cream cheese, powdered sugar, and vanilla extract until smooth.
- Once the cookie cups are cool, pipe or spread the frosting on top and sprinkle with extra chopped pistachios before serving.
6. Chocolate-Hazelnut Baklava

Chocolate-Hazelnut Baklava is a delightful twist on the classic dessert. This version combines flaky layers of phyllo dough with a rich filling of chocolate and hazelnuts, creating a sweet treat that’s perfect for summer picnics. The crispy texture paired with the gooey chocolate makes every bite irresistible.
Making this baklava is simpler than you might think! With just a few ingredients and some patience, you can impress your friends and family with this hand-held dessert. It’s a fun way to enjoy a traditional favorite with a modern twist!
Ingredients
- 1 package of phyllo dough (about 16 oz)
- 1 cup unsalted butter, melted
- 2 cups hazelnuts, finely chopped
- 1 cup dark chocolate chips
- 1 cup granulated sugar
- 1 cup water
- 1 teaspoon vanilla extract
- 1/2 teaspoon ground cinnamon
- Honey for drizzling
- Chopped nuts for garnish
Instructions
- Preheat the oven to 350°F (175°C). Grease a 9×13 inch baking dish.
- In a bowl, mix the chopped hazelnuts, chocolate chips, cinnamon, and half of the sugar.
- Unroll the phyllo dough and cover it with a damp cloth to prevent drying out. Layer 5 sheets of phyllo in the baking dish, brushing each layer with melted butter.
- Spread a layer of the hazelnut-chocolate mixture over the phyllo. Repeat the process, layering 5 sheets of phyllo followed by the filling until all ingredients are used, finishing with 5 layers of phyllo on top.
- Using a sharp knife, cut the baklava into diamond or square shapes.
- Bake for 30-35 minutes, or until golden brown.
- While the baklava is baking, prepare the syrup by combining the remaining sugar, water, and vanilla in a saucepan. Bring to a boil and simmer for about 10 minutes.
- Once the baklava is done, remove it from the oven and immediately pour the syrup over it. Let it cool completely.
- Drizzle with honey and sprinkle with chopped nuts before serving.
7. Boozy Bourbon-Pecan Tassies

Boozy Bourbon-Pecan Tassies are a delightful treat that combines the rich flavors of pecans with a hint of bourbon. These mini pies are perfect for summer picnics, offering a sweet and nutty bite that everyone will love. They are simple to make and can easily be prepared ahead of time, making them a great addition to your dessert spread.
The buttery crust pairs perfectly with the gooey filling, creating a delicious contrast in textures. Each tassie is topped with a whole pecan, adding a touch of elegance. These treats are sure to impress your friends and family without requiring hours in the kitchen!
Ingredients
- 1 cup all-purpose flour
- 1/2 cup unsalted butter, softened
- 1/4 cup powdered sugar
- 1/4 teaspoon salt
- 1 large egg
- 1/2 cup brown sugar, packed
- 1/4 cup corn syrup
- 2 tablespoons bourbon
- 1 cup chopped pecans
- 1 teaspoon vanilla extract
- Whole pecans for topping
Instructions
- Preheat the oven to 350°F (175°C). In a bowl, mix flour, butter, powdered sugar, and salt until crumbly. Press this mixture into the bottom and up the sides of a mini muffin tin to form the crust.
- In another bowl, whisk together the egg, brown sugar, corn syrup, bourbon, vanilla, and chopped pecans until well combined.
- Pour the filling into each crust, filling them about 3/4 full. Top each tassie with a whole pecan.
- Bake for 20-25 minutes or until the filling is set and the crust is golden. Allow to cool before removing from the muffin tin.
- Serve at room temperature and enjoy your delicious Boozy Bourbon-Pecan Tassies!
8. Banana Pudding Paletas

Banana Pudding Paletas are a delightful twist on a classic dessert. These frozen treats combine the creamy goodness of banana pudding with the refreshing chill of popsicles, making them perfect for hot summer days. They are simple to whip up and require just a few ingredients, making them a great option for a quick treat.
With layers of banana flavor and a smooth texture, these paletas are sure to impress everyone at your picnic. They’re not only tasty but also visually appealing, with their beautiful colors and fun presentation. Enjoy these sweet bites as a fun way to cool down!
Ingredients
- 2 ripe bananas
- 1 cup milk
- 1/2 cup sweetened condensed milk
- 1 teaspoon vanilla extract
- 1/2 cup whipped cream
- 1/4 cup crushed vanilla wafers
- 1/4 cup banana pudding mix
- 1/4 cup strawberry puree (optional for layering)
Instructions
- Blend the bananas, milk, sweetened condensed milk, and vanilla extract in a blender until smooth.
- In a bowl, mix the whipped cream and banana pudding mix until well combined.
- Layer the banana mixture and the pudding mixture into popsicle molds, alternating as desired.
- If using, add a layer of strawberry puree for a colorful twist.
- Insert sticks and freeze for at least 4-6 hours, or until solid.
- To remove, run warm water over the outside of the molds for a few seconds and gently pull out the paletas.
- Serve immediately and enjoy the refreshing taste!
9. Cherry-Lime Ice Pops

Cherry-lime ice pops are the perfect treat for hot summer days. They combine the sweet, juicy flavor of cherries with a refreshing zing of lime, creating a delightful balance that’s hard to resist. Plus, they’re super easy to whip up, making them a great choice for a quick dessert.
These ice pops are not only tasty but also visually appealing with their vibrant colors. You can enjoy them as a fun snack at picnics or a cool treat after a day in the sun. Gather your ingredients and get ready to enjoy a delicious homemade treat!
Ingredients
- 2 cups fresh cherries, pitted
- 1 cup lime juice (about 4-5 limes)
- 1/2 cup granulated sugar
- 1 cup coconut milk
- 1/2 cup water
Instructions
- Blend the Cherries: In a blender, combine the pitted cherries, lime juice, sugar, and water. Blend until smooth.
- Strain the Mixture: Pour the blended mixture through a fine mesh strainer into a bowl to remove any solids.
- Prepare the Coconut Layer: In another bowl, mix the coconut milk with a bit of sugar if desired for sweetness.
- Layer the Mixtures: Pour a layer of the cherry mixture into ice pop molds, filling them about halfway. Then, add a layer of coconut milk. Repeat the layers until the molds are full.
- Insert Sticks: Place the sticks into the molds and freeze for at least 4-6 hours or until solid.
- Unmold and Enjoy: To release the pops, run warm water over the outside of the molds for a few seconds. Enjoy your refreshing cherry-lime ice pops!
10. Toffee-Studded Brownies

These toffee-studded brownies are a delightful treat for any summer picnic. Rich, fudgy, and loaded with bits of crunchy toffee, they offer a perfect balance of sweetness and texture. Simple to whip up, they’re sure to impress your friends and family.
With a gooey center and a shiny chocolate glaze, these brownies are not only easy to make but also a joy to eat. Just cut them into squares, pack them up, and you’re ready for a sweet addition to your picnic spread!
Ingredients
- 1 cup unsalted butter
- 2 cups granulated sugar
- 4 large eggs
- 1 teaspoon vanilla extract
- 1 cup all-purpose flour
- 1 cup unsweetened cocoa powder
- 1 teaspoon baking powder
- 1/2 teaspoon salt
- 1 cup toffee bits
- 1/2 cup semi-sweet chocolate chips
Instructions
- Preheat the oven to 350°F (175°C). Grease a 9×13 inch baking pan.
- In a saucepan, melt the butter over low heat. Remove from heat and stir in sugar, eggs, and vanilla until well combined.
- In a separate bowl, whisk together flour, cocoa powder, baking powder, and salt. Gradually add this mixture to the butter mixture, stirring until just combined.
- Fold in toffee bits and chocolate chips. Pour the batter into the prepared pan and spread evenly.
- Bake for 25-30 minutes, or until a toothpick inserted in the center comes out with a few moist crumbs. Let cool before cutting into squares.
11. Mini Black-Bottom Cheesecakes

These mini black-bottom cheesecakes are a delightful treat for summer picnics. With a rich chocolate crust and a creamy cheesecake filling, they offer a perfect balance of flavors. Topped with a glossy chocolate ganache and a dollop of whipped cream, they are as beautiful as they are delicious.
Making these cheesecakes is simple and fun! They come together quickly and can be made ahead of time, making them a stress-free dessert option for any gathering. Your friends and family will love these bite-sized delights!
Ingredients
- 1 1/2 cups chocolate cookie crumbs
- 1/4 cup unsalted butter, melted
- 2 cups cream cheese, softened
- 1/2 cup granulated sugar
- 2 large eggs
- 1 teaspoon vanilla extract
- 1/2 cup sour cream
- 1 cup semi-sweet chocolate chips
- 1/2 cup heavy cream
- Fresh berries for topping
Instructions
- Preheat the oven to 325°F (160°C). Line a muffin tin with cupcake liners.
- In a bowl, mix chocolate cookie crumbs and melted butter until combined. Press the mixture into the bottom of each liner to form a crust.
- In a large bowl, beat cream cheese and sugar until smooth. Add eggs, one at a time, mixing well after each addition. Stir in vanilla and sour cream until fully combined.
- Pour the cheesecake mixture over the crusts in the muffin tin, filling each liner about 3/4 full.
- Bake for 20-25 minutes, or until the centers are set. Remove from the oven and let cool completely.
- In a small saucepan, heat heavy cream until just simmering. Remove from heat and add chocolate chips, stirring until melted and smooth.
- Once the cheesecakes are cool, pour the chocolate ganache over the tops. Chill in the refrigerator for at least 2 hours.
- Before serving, top with fresh berries and a dollop of whipped cream. Enjoy!
12. Frozen Empanadillas

Frozen empanadillas are a delightful treat perfect for summer picnics. These hand-held pastries are filled with sweet fruit and then frozen, making them a refreshing dessert on a warm day. With a crispy outer layer and a fruity filling, they offer a burst of flavor in every bite.
Making these empanadillas is simple and fun! You can customize the filling with your favorite fruits, and they’re easy to prepare ahead of time. Just grab them from the freezer when you’re ready to enjoy a sweet treat outdoors!
Ingredients
- 2 cups all-purpose flour
- 1/2 teaspoon salt
- 1/4 cup unsalted butter, softened
- 1/2 cup cold water
- 1 cup mixed berries (strawberries, blueberries, raspberries)
- 1/4 cup granulated sugar
- 1 tablespoon lemon juice
- Powdered sugar for dusting
Instructions
- Make the Dough: In a bowl, mix flour and salt. Cut in the butter until crumbly. Gradually add cold water, mixing until a dough forms. Knead lightly, wrap in plastic, and chill for 30 minutes.
- Prepare the Filling: In another bowl, combine mixed berries, granulated sugar, and lemon juice. Toss gently to coat the berries.
- Roll Out the Dough: On a floured surface, roll out the dough to about 1/8 inch thick. Cut into circles (about 4 inches in diameter).
- Fill the Empanadillas: Place a spoonful of the berry mixture in the center of each circle. Fold over and press the edges to seal. Crimp with a fork for a decorative touch.
- Freeze: Place the empanadillas on a baking sheet and freeze until solid. Once frozen, transfer to a zip-top bag for easy storage.
- Serve: When ready to enjoy, remove from the freezer, dust with powdered sugar, and serve immediately!
13. Ice Cream Pie Bars

Ice Cream Pie Bars are a delightful treat that combines the creamy goodness of ice cream with a crunchy crust. They are perfect for summer picnics, offering a refreshing taste that everyone will love. With layers of your favorite ice cream and a simple cookie crust, these bars are not only delicious but also easy to make.
These bars are a fun way to enjoy ice cream in a portable form. The combination of flavors and textures makes each bite a joy. Plus, you can customize them with your favorite toppings, making them a hit at any gathering!
Ingredients
- 1 ½ cups crushed graham crackers
- ½ cup unsalted butter, melted
- ¼ cup granulated sugar
- 3 cups ice cream (any flavor)
- ½ cup chocolate syrup
- ½ cup whipped cream
- Fresh fruit or sprinkles for topping (optional)
Instructions
- Prepare the Crust: In a bowl, mix crushed graham crackers, melted butter, and sugar until combined. Press the mixture into the bottom of a lined 9×9 inch baking dish.
- Add Ice Cream: Soften the ice cream slightly and spread it evenly over the crust. Use a spatula to smooth the top.
- Drizzle Chocolate: Pour chocolate syrup over the ice cream layer, swirling it in for a marbled effect.
- Freeze: Cover the dish with plastic wrap and freeze for at least 4 hours or until firm.
- Serve: Once frozen, remove from the dish and cut into bars. Top with whipped cream and fresh fruit or sprinkles if desired.
14. Fruit Skewers

Fruit skewers are a fun and refreshing treat perfect for summer picnics. They combine juicy fruits like strawberries, pineapple, and melon, making each bite a burst of flavor. Plus, they are super easy to assemble, so you can whip them up in no time!
These colorful skewers are not only tasty but also healthy, making them a great choice for all ages. Serve them with a yogurt dip or enjoy them as is. Either way, they’re sure to be a hit!
Ingredients
- 1 cup strawberries, hulled
- 1 cup pineapple, cubed
- 1 cup cantaloupe, cubed
- 1 cup honeydew melon, cubed
- Wooden skewers
Instructions
- Prepare the Fruit: Wash and hull the strawberries. Cut the pineapple, cantaloupe, and honeydew into bite-sized cubes.
- Assemble the Skewers: Take a wooden skewer and thread a strawberry, followed by a piece of pineapple, cantaloupe, and honeydew. Repeat until the skewer is filled, leaving some space at the end for handling.
- Chill and Serve: Place the assembled skewers in the refrigerator for about 30 minutes before serving. This keeps them cool and refreshing!
15. Chocolate-Hazelnut Brownie Cups

Chocolate-Hazelnut Brownie Cups are the perfect treat for summer picnics. These bite-sized delights combine rich, fudgy brownie with a creamy hazelnut filling, making them a crowd-pleaser. They’re simple to whip up, requiring just a few ingredients and minimal time in the kitchen.
The taste is a heavenly mix of chocolate and nutty flavors, topped with crunchy hazelnuts for added texture. These cups are not only delicious but also portable, making them ideal for outdoor gatherings. Everyone will love grabbing one (or two!) as they enjoy the sunshine.
Ingredients
- 1 cup unsalted butter
- 2 cups granulated sugar
- 4 large eggs
- 1 teaspoon vanilla extract
- 1 cup all-purpose flour
- 1/2 cup unsweetened cocoa powder
- 1/4 teaspoon salt
- 1 cup hazelnut spread
- 1/2 cup chopped hazelnuts
Instructions
- Preheat the oven to 350°F (175°C) and grease a muffin tin.
- In a saucepan, melt the butter over low heat. Once melted, remove from heat and stir in the sugar, eggs, and vanilla until well combined.
- Add the flour, cocoa powder, and salt to the mixture, stirring until just combined.
- Spoon the brownie batter into the prepared muffin tin, filling each cup about halfway.
- Add a dollop of hazelnut spread on top of the brownie batter in each cup.
- Bake for 15-18 minutes, or until a toothpick inserted comes out with a few moist crumbs.
- Remove from the oven and sprinkle chopped hazelnuts on top while still warm.
- Let them cool in the tin for a few minutes before transferring to a wire rack to cool completely.
16. Apricot Or Almond Travel Cakes

Apricot or almond travel cakes are a delightful treat perfect for summer picnics. These cakes are light and airy, with a sweet, fruity flavor that pairs beautifully with the nutty undertones of almonds. They are easy to make, requiring simple ingredients and minimal preparation time, making them a great choice for any outdoor gathering.
Each bite offers a satisfying crunch from the layers, followed by a soft, moist center filled with apricot goodness. These cakes not only taste amazing but also look beautiful on a picnic blanket, adding a touch of charm to your summer spread.
Ingredients
- 2 cups all-purpose flour
- 1 cup granulated sugar
- 1/2 cup unsalted butter, softened
- 3 large eggs
- 1 teaspoon vanilla extract
- 1 teaspoon baking powder
- 1/2 teaspoon salt
- 1 cup apricot preserves
- 1/2 cup sliced almonds
- Powdered sugar for dusting
Instructions
- Preheat the oven to 350°F (175°C). Grease and flour a baking pan.
- In a large bowl, cream together the softened butter and granulated sugar until light and fluffy. Add the eggs one at a time, mixing well after each addition. Stir in the vanilla extract.
- In another bowl, whisk together the flour, baking powder, and salt. Gradually add the dry ingredients to the wet mixture, mixing until just combined.
- Spread half of the batter into the prepared baking pan. Layer the apricot preserves evenly over the batter, then sprinkle with sliced almonds. Top with the remaining batter.
- Bake for 25-30 minutes or until a toothpick inserted into the center comes out clean. Let cool in the pan for 10 minutes before transferring to a wire rack.
- Once cooled, dust with powdered sugar before slicing into squares. Enjoy your apricot or almond travel cakes at your next picnic!