25 Refreshing Summer Dessert Recipes to Beat the Heat
Get ready to whip up some sweet indulgences that perfectly capture the essence of summer! These 25 dessert recipes feature vibrant fruits, refreshing flavors, and delightful textures that will keep you cool and satisfied. From frozen treats to light cakes, each recipe showcases simple techniques and seasonal ingredients to make your summertime gatherings a breeze. Let’s turn those warm days into delicious memories!
Watermelon Feta Salad with Mint
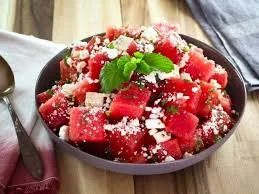
This Watermelon Feta Salad with Mint is a refreshing treat perfect for hot summer days. The sweet, juicy watermelon pairs beautifully with the salty feta, while fresh mint adds a burst of flavor. It’s simple to whip up and makes a great side dish or light dessert.
With just a few ingredients, you can create a colorful and tasty salad that will impress your guests. It’s a delightful mix of sweet and savory that’s sure to cool you down!
Ingredients
- 4 cups watermelon, cubed
- 1 cup feta cheese, crumbled
- 1/4 cup fresh mint leaves, chopped
- 2 tablespoons balsamic glaze
- Salt and pepper to taste
Instructions
- In a large bowl, combine the cubed watermelon and crumbled feta cheese.
- Add the chopped mint leaves and gently toss to mix.
- Drizzle the balsamic glaze over the salad and season with salt and pepper to taste.
- Serve immediately or chill for a bit before serving to let the flavors meld.
Mango Coconut Sorbet

Mango Coconut Sorbet is a refreshing treat perfect for hot summer days. The combination of sweet mango and creamy coconut creates a delightful flavor that’s both tropical and satisfying. Plus, it’s super easy to make, requiring just a few simple ingredients!
This sorbet is not only delicious but also a healthier alternative to traditional ice cream. With its vibrant color and smooth texture, it’s sure to impress your friends and family. Enjoy it on its own or as a topping for your favorite desserts!
Ingredients
- 2 ripe mangoes, peeled and diced
- 1 cup coconut milk
- 1/4 cup sugar (adjust to taste)
- 1 tablespoon lime juice
- Fresh mint leaves for garnish (optional)
Instructions
- Blend the mangoes: In a blender, combine the diced mangoes, coconut milk, sugar, and lime juice. Blend until smooth.
- Taste and adjust: Taste the mixture and add more sugar if desired. Blend again to combine.
- Freeze the mixture: Pour the mango mixture into a shallow dish and place it in the freezer. Freeze for about 4-6 hours, stirring every hour to break up any ice crystals.
- Serve: Once the sorbet is frozen and fluffy, scoop it into bowls. Garnish with fresh mint leaves if you like.
Grilled Peaches with Honey and Ricotta
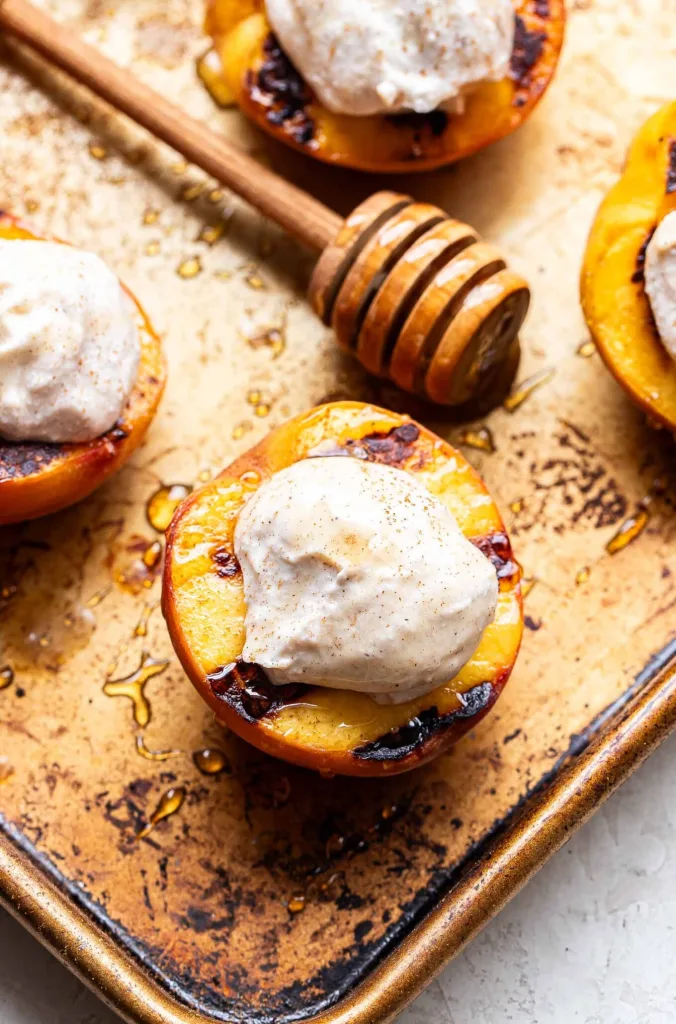
Grilled peaches with honey and ricotta are a delightful summer treat. The warm, caramelized peaches pair perfectly with creamy ricotta and a drizzle of honey, creating a sweet and satisfying dessert. This recipe is simple to make and requires just a few ingredients, making it perfect for any gathering or a cozy night in.
The combination of flavors is refreshing and light, ideal for warm weather. Plus, grilling the peaches adds a smoky sweetness that elevates this dish to a whole new level. You’ll love how easy it is to whip up this delicious dessert!
Ingredients
- 4 ripe peaches, halved and pitted
- 1 cup ricotta cheese
- 2 tablespoons honey, plus extra for drizzling
- 1 teaspoon vanilla extract
- Fresh mint leaves for garnish
- Olive oil for grilling
Instructions
- Preheat the grill to medium heat. Brush the cut sides of the peaches with a little olive oil.
- Place the peaches cut-side down on the grill. Grill for about 4-5 minutes, or until they have nice grill marks and are slightly softened.
- In a bowl, mix the ricotta cheese, honey, and vanilla extract until well combined.
- Remove the peaches from the grill and place them on a serving plate, cut-side up.
- Spoon the ricotta mixture over each peach half and drizzle with additional honey.
- Garnish with fresh mint leaves before serving. Enjoy your delicious grilled peaches!
Raspberry Lemonade Popsicles
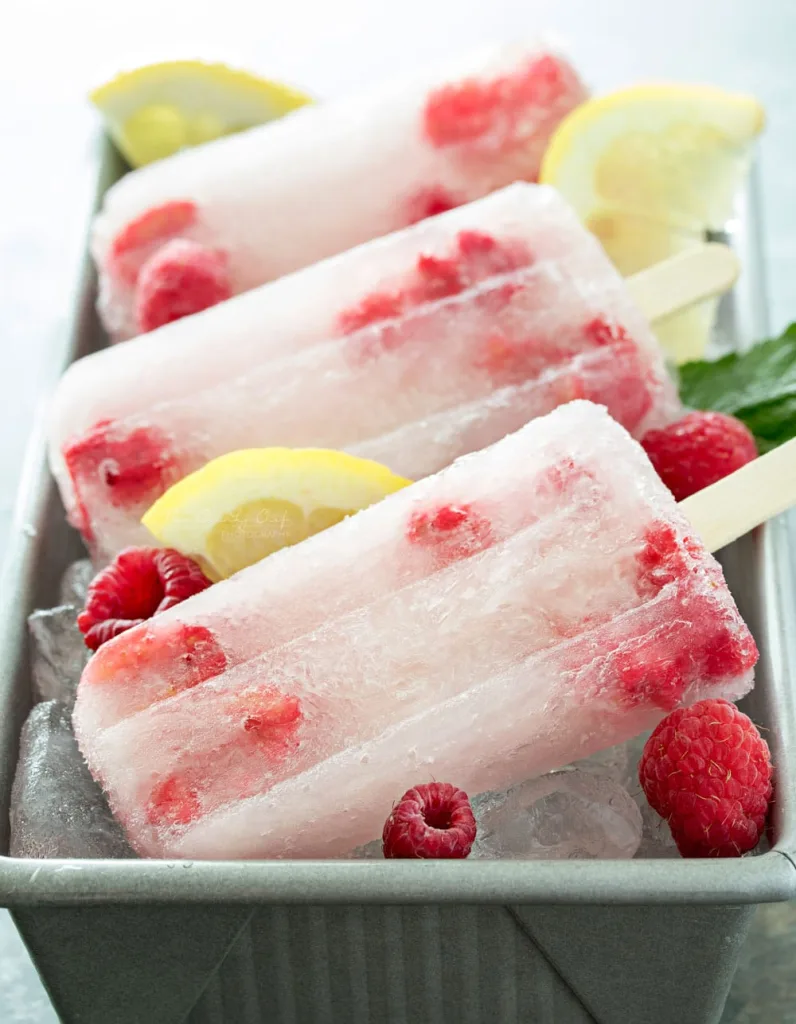
Raspberry Lemonade Popsicles are the perfect treat for hot summer days. They combine the tartness of fresh lemons with the sweetness of ripe raspberries, creating a refreshing flavor that’s hard to resist. Plus, they’re super easy to whip up, making them a great choice for a quick dessert or snack.
These popsicles are not only delicious but also visually appealing with vibrant colors and fresh fruit pieces. You can enjoy them guilt-free, as they’re made with simple ingredients and no artificial flavors. Grab your popsicle molds, and let’s get started!
Ingredients
- 2 cups fresh raspberries
- 1 cup freshly squeezed lemon juice
- 1/2 cup granulated sugar
- 2 cups water
- 1 cup lemonade (store-bought or homemade)
Instructions
- Blend the Raspberries: In a blender, combine the fresh raspberries and 1 cup of water. Blend until smooth, then strain the mixture through a fine mesh sieve to remove the seeds.
- Mix the Lemonade: In a large bowl, whisk together the lemon juice, sugar, and remaining water until the sugar is dissolved. Stir in the raspberry puree and lemonade.
- Fill the Molds: Pour the mixture into popsicle molds, leaving a little space at the top for expansion. Add a few whole raspberries to each mold for extra flavor and visual appeal.
- Insert Sticks: Place the popsicle sticks in the molds and freeze for at least 4-6 hours, or until fully set.
- Unmold and Enjoy: To remove the popsicles, run warm water over the outside of the molds for a few seconds. Gently pull the popsicles out and enjoy your refreshing treat!
No-Bake Strawberry Shortcake Cups
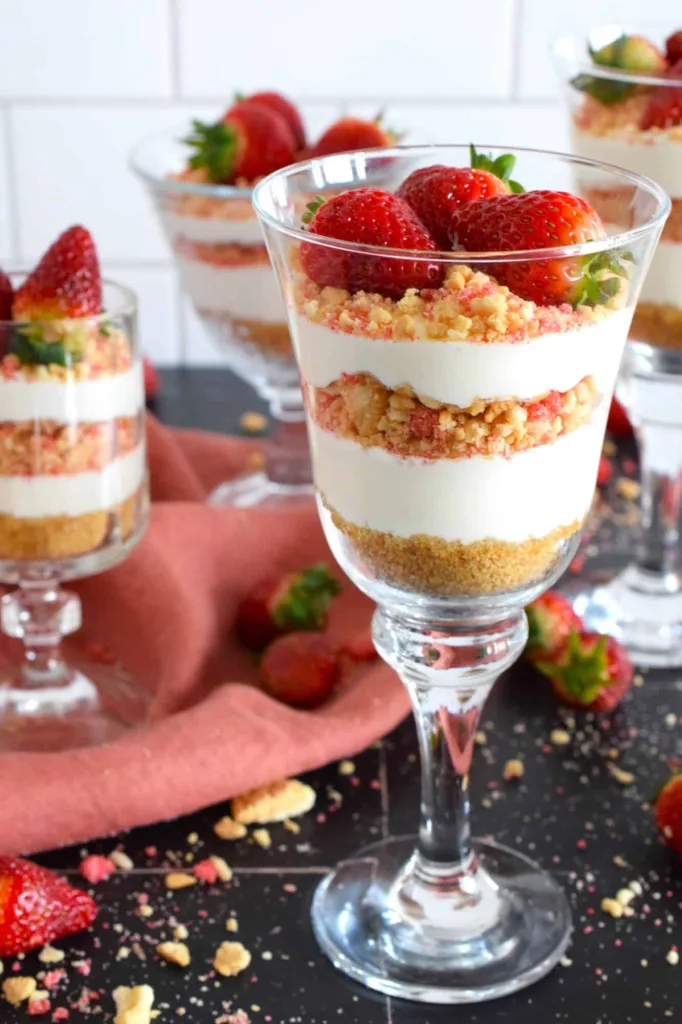
No-bake strawberry shortcake cups are a delightful treat perfect for summer. These cups combine layers of fluffy cake, fresh strawberries, and creamy whipped topping, creating a light and refreshing dessert. The sweetness of the strawberries pairs beautifully with the rich cream, making every bite a burst of flavor.
This recipe is super easy to whip up, requiring no baking at all! It’s a great option for those hot days when you want something sweet without turning on the oven. Plus, you can customize it with your favorite fruits or toppings!
Ingredients
- 2 cups fresh strawberries, sliced
- 1 cup heavy whipping cream
- 1/4 cup powdered sugar
- 1 teaspoon vanilla extract
- 1 cup pound cake, cut into small pieces
- Mint leaves for garnish (optional)
Instructions
- Prepare the Strawberries: In a bowl, mix the sliced strawberries with a tablespoon of sugar. Let them sit for about 10 minutes to release their juices.
- Make the Whipped Cream: In a separate bowl, beat the heavy cream, powdered sugar, and vanilla extract until soft peaks form.
- Layer the Cups: In serving cups, add a layer of pound cake pieces, followed by a layer of strawberries, and then a layer of whipped cream. Repeat the layers until the cups are filled.
- Chill: Refrigerate the cups for at least 30 minutes before serving to allow the flavors to meld.
- Garnish: Top with extra strawberries and mint leaves if desired before serving.
Peach Melba Parfaits
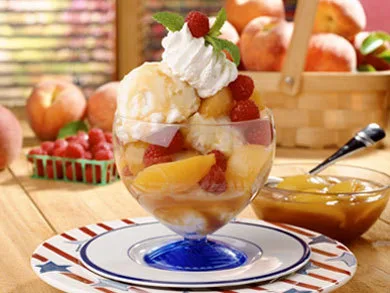
Peach Melba Parfaits are a delightful treat that combines the sweetness of fresh peaches with creamy layers of yogurt and a hint of raspberry. This dessert is not only refreshing but also simple to whip up, making it perfect for summer gatherings or a cozy night in.
The combination of flavors is a real crowd-pleaser. The juicy peaches pair beautifully with the tart raspberry sauce, while the creamy yogurt adds a smooth texture. Plus, you can prepare them in just a few minutes, making it an easy choice for any occasion!
Ingredients
- 4 ripe peaches, sliced
- 1 cup raspberries
- 2 tablespoons sugar
- 1 cup Greek yogurt
- 1 teaspoon vanilla extract
- 1 cup granola
- Mint leaves for garnish (optional)
Instructions
- Prepare the Raspberry Sauce: In a small saucepan, combine raspberries and sugar over medium heat. Cook until the raspberries break down and the mixture thickens, about 5-7 minutes. Let it cool.
- Mix the Yogurt: In a bowl, combine Greek yogurt and vanilla extract. Stir until well mixed.
- Layer the Parfaits: In serving glasses, start with a layer of yogurt, followed by a layer of peach slices, then a layer of raspberry sauce. Repeat the layers until the glasses are filled.
- Top with Granola: Finish with a layer of granola on top for crunch.
- Garnish: Add mint leaves if desired and serve immediately.
Chocolate Chip Cookie Ice Cream Sandwiches
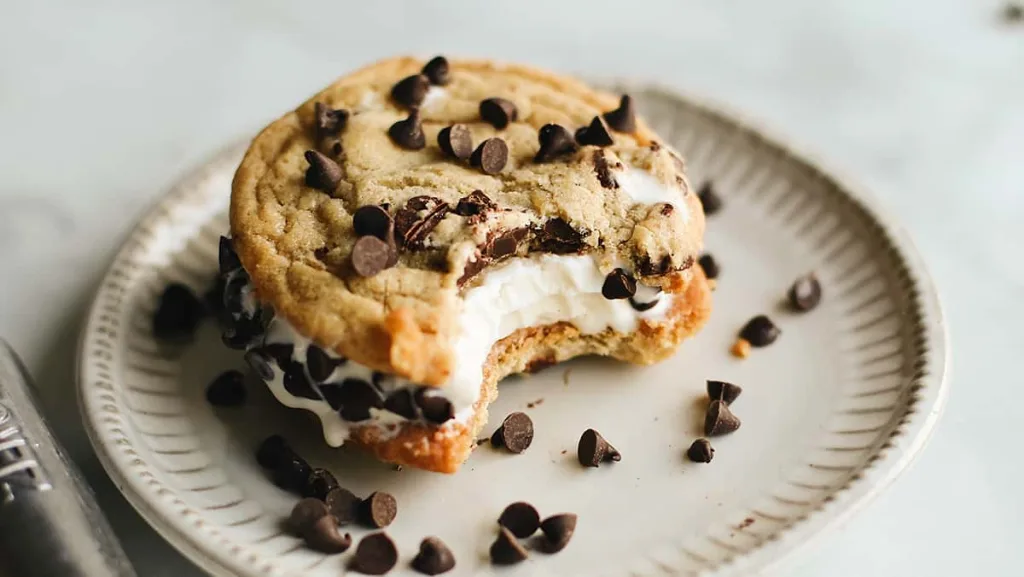
Chocolate chip cookie ice cream sandwiches are a delightful treat that combines two classic favorites. The warm, chewy cookies paired with creamy ice cream create a perfect balance of flavors and textures. They are simple to make and can be customized with your favorite ice cream flavors.
This recipe is not only easy but also fun to prepare. You can get creative by adding toppings or mixing in different ingredients. Enjoy these sandwiches on a hot summer day or as a sweet snack any time of the year!
Ingredients
- 1 cup unsalted butter, softened
- 3/4 cup granulated sugar
- 3/4 cup brown sugar, packed
- 1 teaspoon vanilla extract
- 2 large eggs
- 2 1/4 cups all-purpose flour
- 1 teaspoon baking soda
- 1/2 teaspoon salt
- 2 cups chocolate chips
- 1 quart ice cream (any flavor)
Instructions
- Preheat the oven to 350°F (175°C). Line a baking sheet with parchment paper.
- In a large bowl, cream together the softened butter, granulated sugar, brown sugar, and vanilla extract until smooth.
- Add the eggs one at a time, mixing well after each addition.
- In another bowl, whisk together the flour, baking soda, and salt. Gradually add the dry ingredients to the wet mixture, stirring until just combined. Fold in the chocolate chips.
- Drop rounded tablespoons of dough onto the prepared baking sheet, spacing them about 2 inches apart.
- Bake for 10-12 minutes, or until the edges are golden brown. Let them cool on the baking sheet for a few minutes before transferring to a wire rack to cool completely.
- Once the cookies are cool, take one cookie and place a scoop of ice cream on the flat side. Top with another cookie, pressing down gently to create a sandwich. Repeat with the remaining cookies and ice cream.
- For a fun twist, roll the edges of the ice cream sandwiches in extra chocolate chips. Serve immediately or freeze for later!
Lemon Blueberry Cheesecake Bars
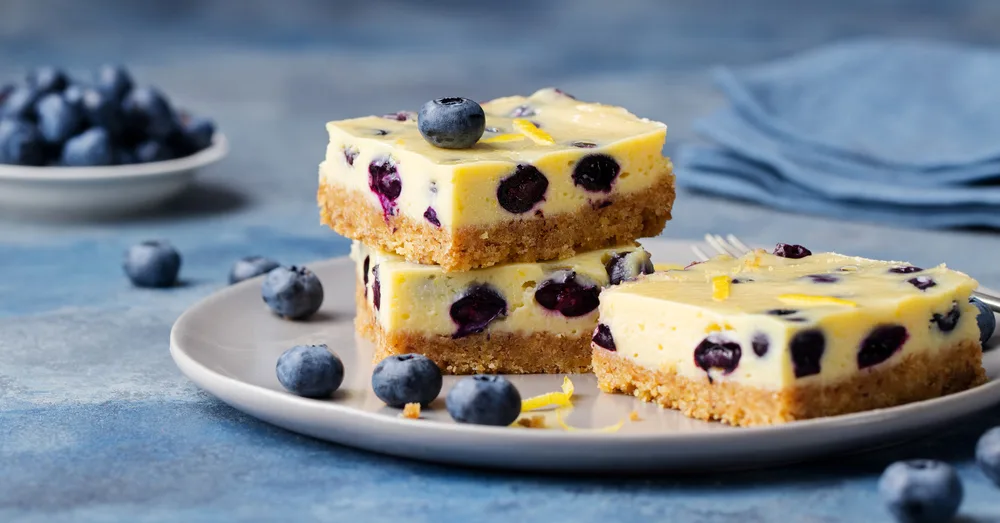
Lemon Blueberry Cheesecake Bars are a delightful treat perfect for summer. The creamy cheesecake layer is brightened with fresh lemon juice and topped with juicy blueberries, creating a refreshing dessert that’s both tangy and sweet. These bars are simple to make, making them a great choice for gatherings or a sweet snack at home.
With a buttery graham cracker crust, these bars are not only easy to whip up but also look stunning on any dessert table. They’re a crowd-pleaser, combining the classic flavors of cheesecake with the vibrant taste of summer fruits.
Ingredients
- 1 ½ cups graham cracker crumbs
- ½ cup unsalted butter, melted
- 2 cups cream cheese, softened
- 1 cup granulated sugar
- 3 large eggs
- 1/4 cup fresh lemon juice
- 1 tablespoon lemon zest
- 1 cup fresh blueberries
Instructions
- Preheat the oven to 325°F (160°C). Grease a 9×9-inch baking pan.
- Make the Crust: In a bowl, combine graham cracker crumbs and melted butter. Press the mixture firmly into the bottom of the prepared pan.
- Prepare the Filling: In a large mixing bowl, beat the cream cheese and sugar until smooth. Add the eggs one at a time, mixing well after each addition. Stir in lemon juice and lemon zest until fully combined.
- Fold in the blueberries gently to avoid breaking them. Pour the filling over the crust in the baking pan.
- Bake for 30-35 minutes, or until the center is set and slightly jiggles. Remove from the oven and let cool completely.
- Chill in the refrigerator for at least 2 hours before cutting into bars. Serve chilled and enjoy!
Coconut Lime Rice Pudding

Coconut Lime Rice Pudding is a delightful dessert that brings a tropical twist to a classic favorite. The creamy texture of the rice pudding pairs perfectly with the zesty lime and rich coconut flavors, creating a refreshing treat for warm summer days.
This recipe is simple to make and requires just a few ingredients, making it a great choice for both novice and experienced cooks. Serve it chilled, and you’ll have a dessert that’s sure to impress!
Ingredients
- 1 cup Arborio rice
- 4 cups coconut milk
- 1/2 cup granulated sugar
- 1/4 teaspoon salt
- 1 teaspoon vanilla extract
- 1 tablespoon lime zest
- 1/4 cup lime juice
- 1/2 cup toasted coconut flakes (for garnish)
Instructions
- Combine Ingredients: In a medium saucepan, combine Arborio rice, coconut milk, sugar, and salt. Stir well.
- Cook the Mixture: Bring the mixture to a gentle boil over medium heat. Reduce the heat to low and simmer, stirring occasionally, for about 25-30 minutes, or until the rice is tender and the pudding has thickened.
- Add Flavor: Remove the saucepan from heat. Stir in vanilla extract, lime zest, and lime juice until well combined.
- Chill: Transfer the pudding to a bowl and let it cool to room temperature. Once cooled, cover and refrigerate for at least 2 hours.
- Serve: Before serving, give the pudding a good stir. Top with toasted coconut flakes for added crunch and flavor.
Chilled Cucumber and Yogurt Soup
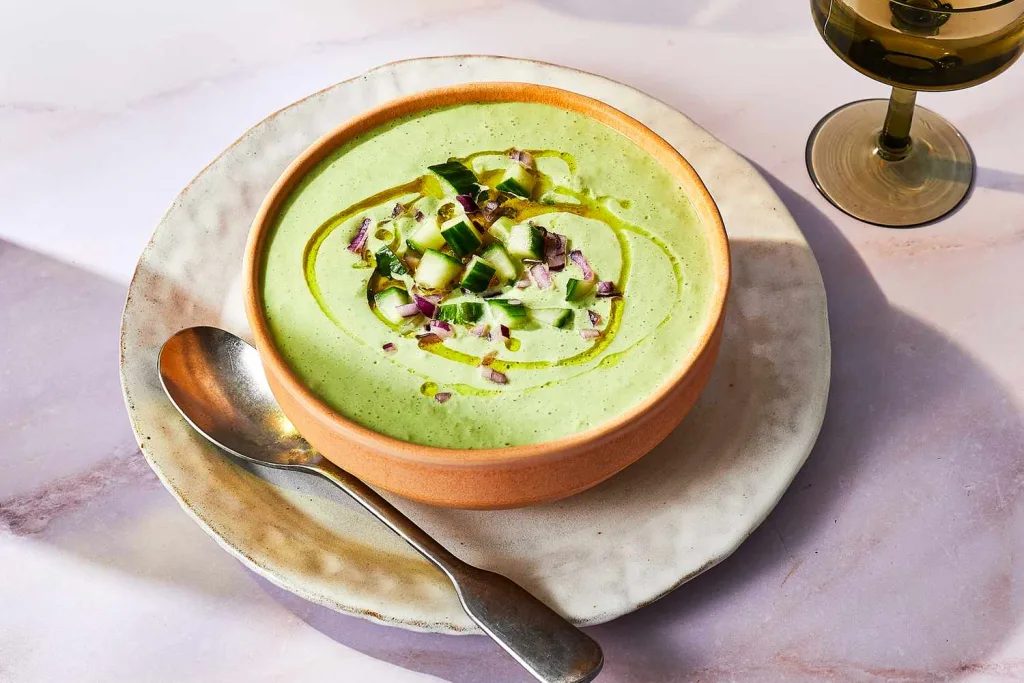
This chilled cucumber and yogurt soup is a refreshing treat for hot summer days. It combines the crispness of cucumbers with the creaminess of yogurt, creating a light and tangy flavor that’s perfect for cooling off.
Simple to make, this soup requires just a few ingredients and minimal prep time. It’s a great way to enjoy fresh produce and can be served as a starter or a light meal.
Ingredients
- 2 large cucumbers, peeled and chopped
- 2 cups plain yogurt
- 1 cup vegetable broth
- 2 tablespoons olive oil
- 1 tablespoon lemon juice
- 1 clove garlic, minced
- Salt and pepper to taste
- Fresh dill for garnish
Instructions
- Blend the Ingredients: In a blender, combine the chopped cucumbers, yogurt, vegetable broth, olive oil, lemon juice, and minced garlic. Blend until smooth.
- Season: Taste the mixture and add salt and pepper as needed. Blend again to incorporate.
- Chill: Transfer the soup to a bowl and refrigerate for at least 1 hour to allow the flavors to meld.
- Serve: Pour the chilled soup into bowls, drizzle with olive oil, and garnish with fresh dill before serving.
Frozen Yogurt Bark with Fruits and Nuts
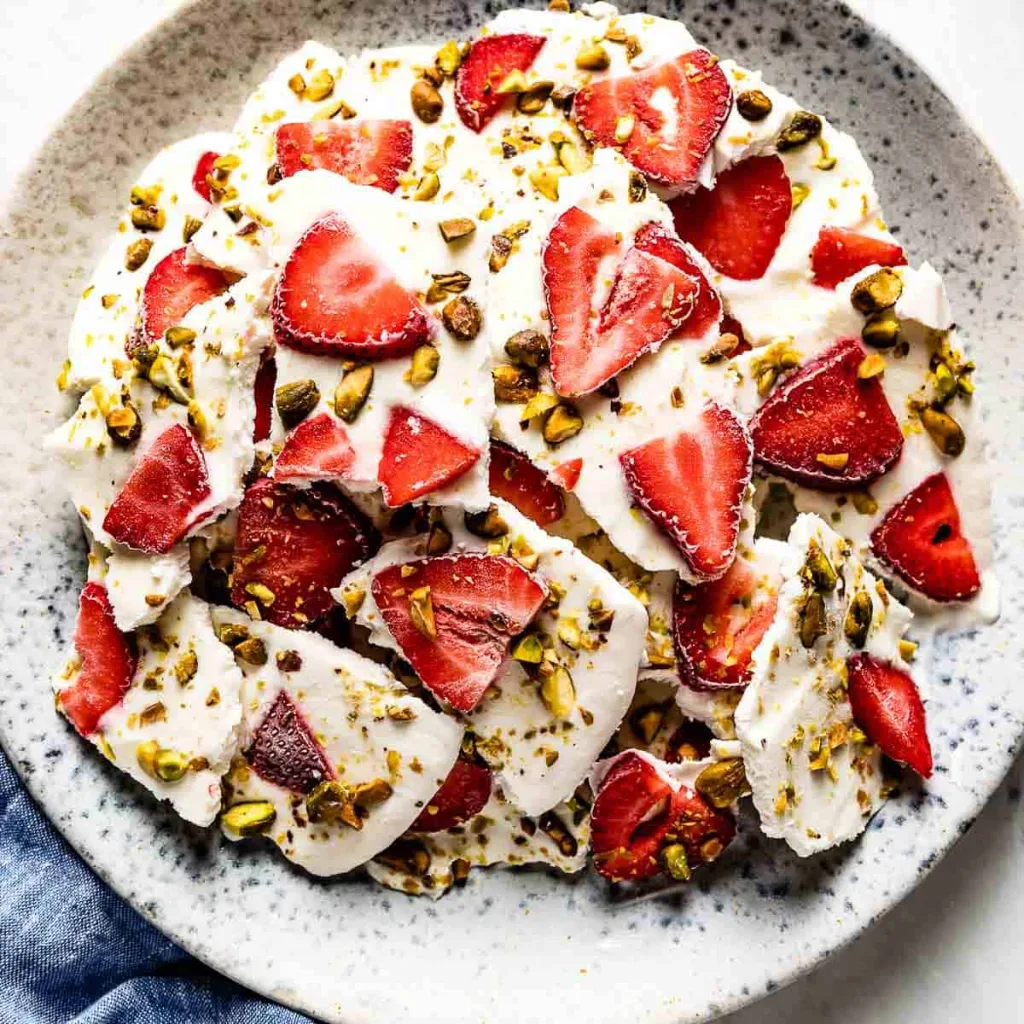
This Frozen Yogurt Bark is a delightful treat perfect for hot summer days. It combines creamy yogurt with a colorful mix of fruits and crunchy nuts, creating a refreshing snack that’s both tasty and healthy. Plus, it’s super easy to make, so you can whip it up in no time!
The sweet and tangy yogurt pairs beautifully with the fresh fruits and the nutty crunch, making each bite a burst of flavor. It’s a fun way to enjoy a frozen dessert without all the guilt. Gather your ingredients, and let’s get started!
Ingredients
- 2 cups Greek yogurt (plain or flavored)
- 1/4 cup honey or maple syrup
- 1 cup mixed berries (strawberries, blueberries, blackberries)
- 1/2 cup nuts (almonds, pecans, or walnuts)
- 1/2 cup dried fruits (apricots or raisins)
- 1/4 cup dark chocolate chips (optional)
Instructions
- Prepare the Yogurt: In a bowl, mix the Greek yogurt with honey or maple syrup until well combined.
- Spread the Mixture: Line a baking sheet with parchment paper. Pour the yogurt mixture onto the sheet and spread it out evenly to about 1/4 inch thick.
- Add Toppings: Sprinkle the mixed berries, nuts, dried fruits, and chocolate chips over the yogurt layer.
- Freeze: Place the baking sheet in the freezer and let it freeze for at least 4 hours or until solid.
- Break into Pieces: Once frozen, remove the yogurt bark from the sheet and break it into pieces. Enjoy immediately or store in an airtight container in the freezer.
Pineapple Upside-Down Cake
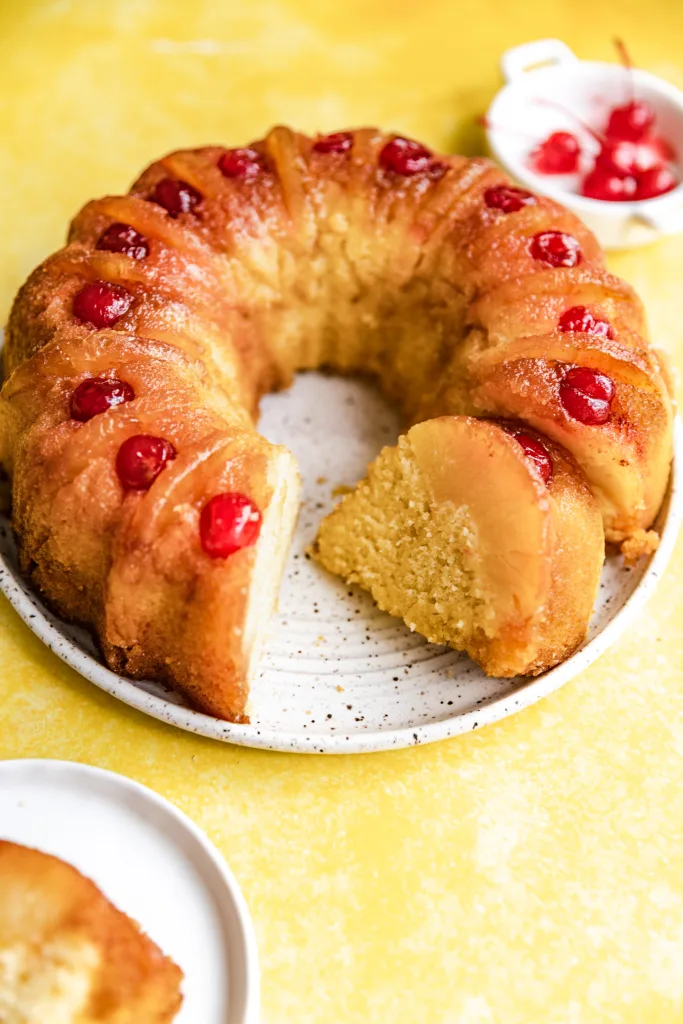
Pineapple Upside-Down Cake is a classic dessert that brings a tropical twist to your table. This cake features a sweet and tangy pineapple topping, perfectly caramelized to create a delightful contrast with the soft, buttery cake beneath. It’s not just delicious; it’s also simple to make, making it a great choice for both novice bakers and seasoned pros.
The combination of juicy pineapple, maraschino cherries, and a moist cake creates a flavor explosion that’s sure to impress. Whether you’re hosting a summer barbecue or just want a sweet treat, this cake is a must-try!
Ingredients
- 1/4 cup unsalted butter
- 1/2 cup packed brown sugar
- 1 can (20 oz) sliced pineapple, drained
- Maraschino cherries
- 1 cup all-purpose flour
- 1 cup granulated sugar
- 1/2 cup milk
- 1/4 cup vegetable oil
- 2 large eggs
- 1 1/2 teaspoons baking powder
- 1/2 teaspoon salt
Instructions
- Preheat your oven to 350°F (175°C). In a round cake pan, melt the butter in the oven. Once melted, sprinkle the brown sugar evenly over the butter.
- Arrange the pineapple slices over the brown sugar and place a cherry in the center of each pineapple slice.
- In a mixing bowl, combine flour, granulated sugar, milk, vegetable oil, eggs, baking powder, and salt. Beat until smooth.
- Pour the batter over the pineapple and cherries in the pan, spreading it evenly.
- Bake for 30-35 minutes or until a toothpick inserted into the center comes out clean.
- Let the cake cool for a few minutes, then carefully invert it onto a serving plate. Serve warm or at room temperature.
Key Lime Pie with Whipped Cream
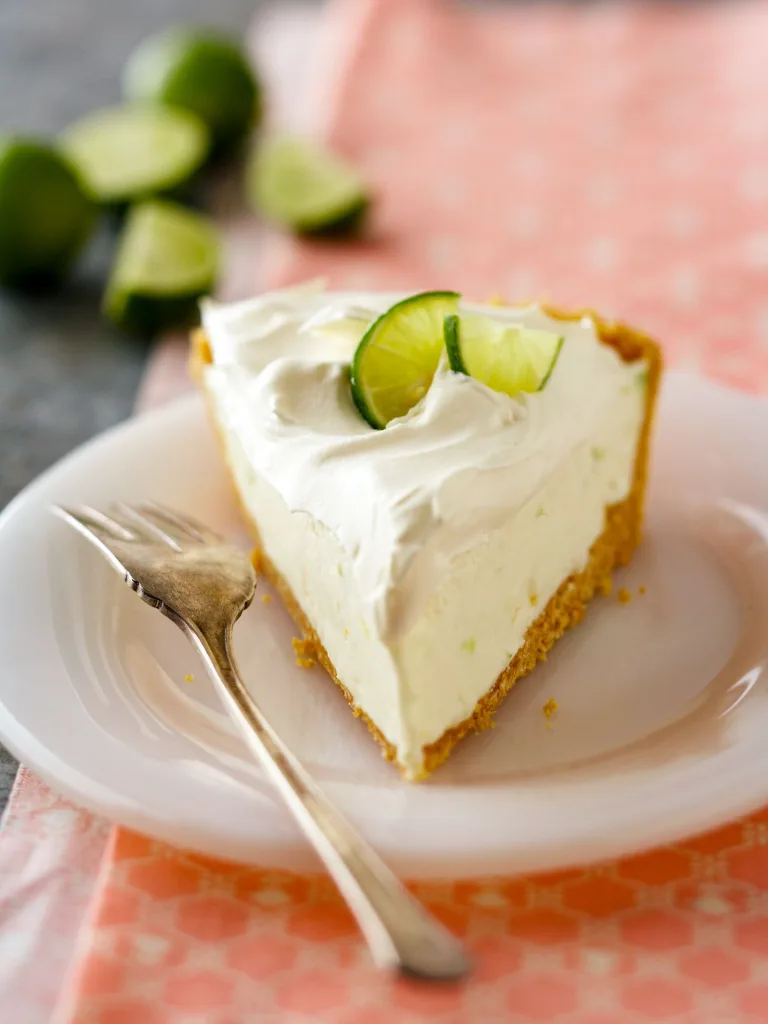
Key Lime Pie is a classic summer dessert that perfectly balances tartness and sweetness. With its creamy filling and buttery graham cracker crust, it’s a refreshing treat that’s simple to whip up. This pie is not only delicious but also a crowd-pleaser, making it a great choice for gatherings or just a sunny day at home.
The bright, zesty flavor of key limes shines through, complemented by a light and fluffy layer of whipped cream on top. You’ll love how easy it is to make, requiring just a few ingredients and minimal effort. Get ready to impress your friends and family with this delightful dessert!
Ingredients
- 1 ½ cups graham cracker crumbs
- ½ cup granulated sugar
- ½ cup unsalted butter, melted
- 4 large egg yolks
- 1 can (14 ounces) sweetened condensed milk
- ½ cup key lime juice
- 1 teaspoon lime zest
- 1 cup heavy whipping cream
- 2 tablespoons powdered sugar
- Additional lime slices for garnish
Instructions
- Make the Crust: Preheat your oven to 350°F (175°C). In a bowl, combine graham cracker crumbs, granulated sugar, and melted butter. Press the mixture into the bottom and up the sides of a pie dish. Bake for 8-10 minutes until golden brown. Let it cool.
- Prepare the Filling: In a mixing bowl, whisk together egg yolks, sweetened condensed milk, key lime juice, and lime zest until smooth. Pour the filling into the cooled crust.
- Bake the Pie: Bake the pie for 15 minutes. Remove from the oven and let it cool to room temperature, then refrigerate for at least 3 hours to set.
- Make the Whipped Cream: In a separate bowl, whip the heavy cream and powdered sugar until soft peaks form.
- Serve: Top the chilled pie with whipped cream and garnish with lime slices before serving. Enjoy your refreshing Key Lime Pie!
Chocolate Covered Banana Bites

Chocolate covered banana bites are a delightful treat that combines the sweetness of ripe bananas with rich chocolate. These bites are not only tasty but also super easy to make, making them perfect for summer gatherings or a quick snack at home.
The creamy banana center paired with the smooth chocolate coating creates a satisfying texture. You can even sprinkle some nuts or sea salt on top for an extra crunch. These bites are sure to please everyone!
Ingredients
- 2 ripe bananas
- 1 cup dark chocolate chips
- 1 tablespoon coconut oil
- 1/4 cup chopped nuts (optional)
- Sea salt (optional)
Instructions
- Prepare the Bananas: Peel the bananas and slice them into bite-sized pieces.
- Melt the Chocolate: In a microwave-safe bowl, combine the dark chocolate chips and coconut oil. Heat in 30-second intervals, stirring in between, until melted and smooth.
- Coat the Banana Slices: Dip each banana slice into the melted chocolate, ensuring it’s fully coated. Use a fork to lift them out and let any excess chocolate drip off.
- Add Toppings: Place the coated banana bites on a parchment-lined baking sheet. If desired, sprinkle chopped nuts or a pinch of sea salt on top.
- Chill: Put the baking sheet in the freezer for about 30 minutes, or until the chocolate is set.
- Serve: Enjoy your chocolate covered banana bites straight from the freezer for a refreshing treat!
S’mores Dip with Graham Crackers
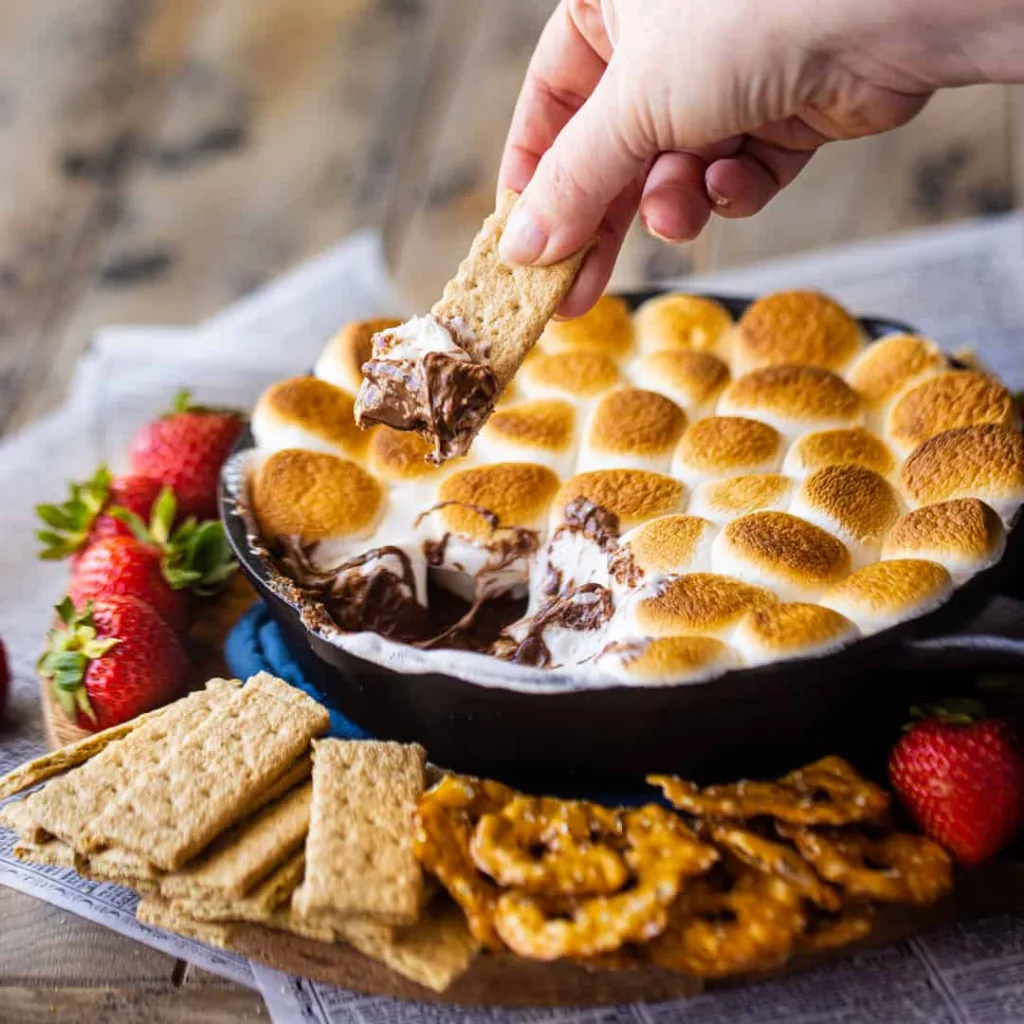
Get ready for a sweet treat that brings the campfire experience right to your kitchen! S’mores dip combines gooey chocolate and toasted marshmallows, creating a delightful dessert that’s perfect for summer gatherings. This recipe is super easy to whip up, making it a hit for both kids and adults.
The rich chocolate pairs perfectly with the fluffy marshmallows, all served with crispy graham crackers for dipping. It’s a fun and interactive way to enjoy a classic treat without the hassle of a fire. Gather your friends and family, and enjoy this delicious dip!
Ingredients
- 1 cup chocolate chips
- 1 cup mini marshmallows
- 1 tablespoon unsalted butter
- 1 teaspoon vanilla extract
- Graham crackers, for serving
Instructions
- Preheat your oven to 450°F (230°C).
- In an oven-safe dish, combine the chocolate chips and butter. Melt in the oven for about 5 minutes, or until the chocolate is soft.
- Stir in the vanilla extract until smooth.
- Top with mini marshmallows and return to the oven for another 3-5 minutes, or until the marshmallows are golden brown.
- Serve warm with graham crackers for dipping.
Berry Tart with Almond Crust
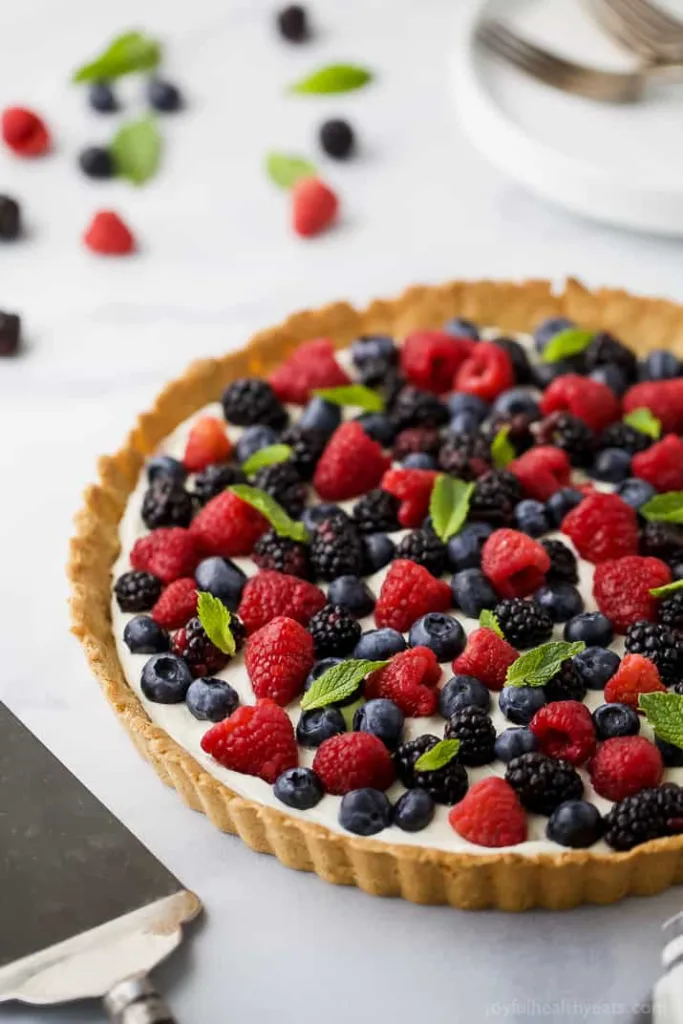
This Berry Tart with Almond Crust is a delightful summer treat that combines the freshness of berries with a nutty, buttery crust. The creamy filling is light and smooth, perfectly complementing the tartness of the berries. It’s simple to make, making it a great choice for both novice bakers and seasoned pros.
The combination of strawberries, blueberries, and blackberries not only looks stunning but also bursts with flavor in every bite. This tart is sure to impress at any gathering, and the best part is that it can be prepared ahead of time, leaving you free to enjoy your summer days!
Ingredients
- 1 1/2 cups almond flour
- 1/4 cup granulated sugar
- 1/4 cup unsalted butter, melted
- 1 large egg
- 1/2 teaspoon vanilla extract
- 1 cup cream cheese, softened
- 1/2 cup powdered sugar
- 1 teaspoon vanilla extract
- 2 cups mixed berries (strawberries, blueberries, blackberries)
- Fresh mint leaves for garnish (optional)
Instructions
- Preheat the oven to 350°F (175°C). In a bowl, mix almond flour, granulated sugar, melted butter, egg, and vanilla extract until well combined.
- Press the mixture into a tart pan evenly across the bottom and up the sides. Bake for 12-15 minutes until golden brown. Let it cool completely.
- In another bowl, beat the cream cheese until smooth. Gradually add powdered sugar and vanilla extract, mixing until creamy.
- Spread the cream cheese mixture over the cooled almond crust.
- Top with mixed berries, arranging them as desired. Garnish with fresh mint leaves if using.
- Chill in the refrigerator for at least 1 hour before serving. Slice and enjoy your refreshing berry tart!
Frozen Strawberry Banana Smoothie Bowl
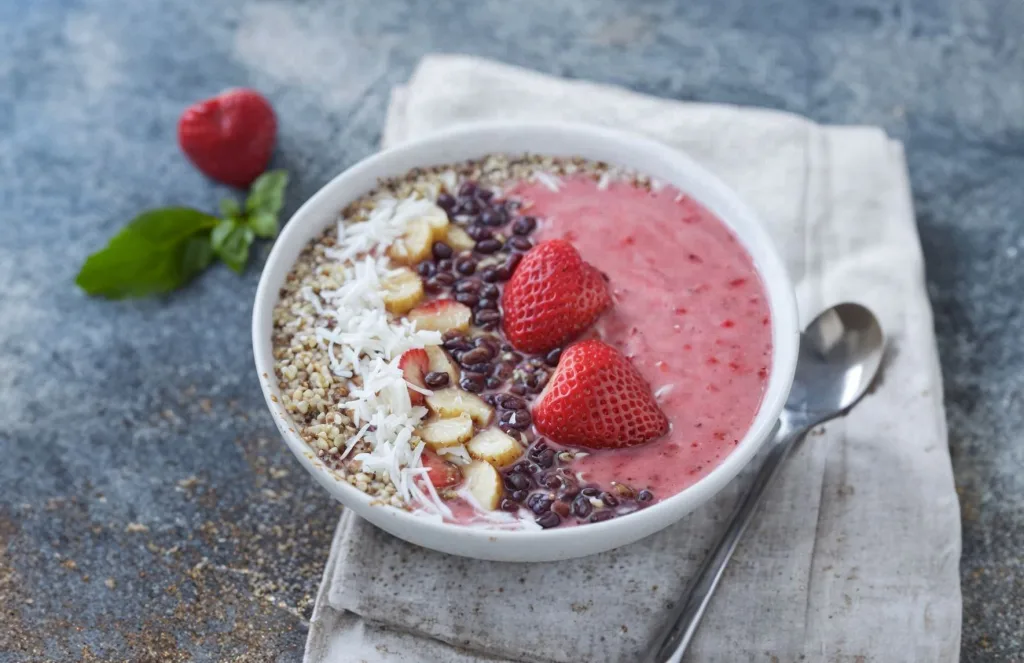
This Frozen Strawberry Banana Smoothie Bowl is a refreshing treat perfect for hot summer days. It combines the sweetness of ripe bananas with the tartness of strawberries, creating a delightful balance of flavors. The creamy texture makes it feel indulgent, while still being healthy and packed with nutrients.
Making this smoothie bowl is super simple! Just blend a few ingredients, pour it into a bowl, and top it with your favorite toppings. It’s a fun way to enjoy a nutritious breakfast or snack that feels like dessert.
Ingredients
- 2 ripe bananas, frozen
- 1 cup strawberries, frozen
- 1/2 cup almond milk (or any milk of choice)
- 1 tablespoon honey or maple syrup (optional)
- Granola, for topping
- Fresh strawberries and banana slices, for garnish
- Chia seeds, for garnish
Instructions
- Blend the Ingredients: In a blender, combine the frozen bananas, frozen strawberries, almond milk, and honey or maple syrup if using. Blend until smooth and creamy.
- Pour into a Bowl: Once blended, pour the smoothie into a bowl.
- Add Toppings: Top with granola, fresh strawberry slices, banana slices, and chia seeds for added texture and nutrition.
- Serve Immediately: Enjoy your smoothie bowl right away for the best flavor and texture!
Chocolate Mousse with Fresh Berries
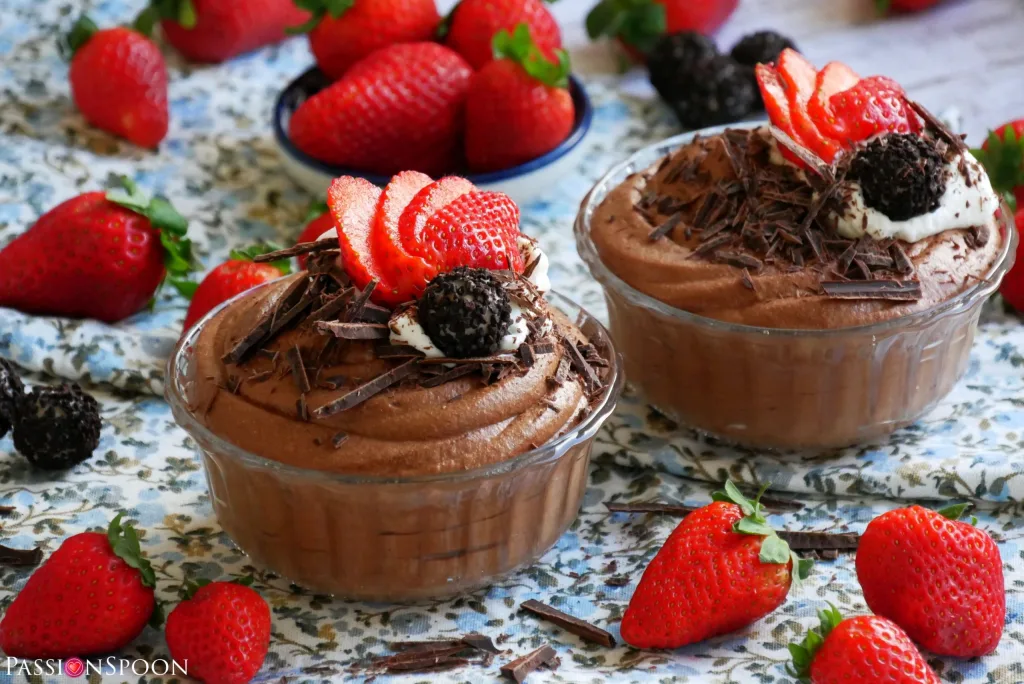
This chocolate mousse is a delightful treat that combines rich, creamy chocolate with the freshness of berries. It’s smooth, light, and has just the right amount of sweetness, making it a perfect dessert for warm summer days.
Making this mousse is simple and doesn’t require any baking. Just whip up some ingredients, chill, and you’re ready to impress your friends and family with a stunning dessert!
Ingredients
- 1 cup heavy cream
- 1/2 cup semi-sweet chocolate chips
- 2 tablespoons sugar
- 1 teaspoon vanilla extract
- 1/2 cup fresh strawberries, sliced
- 1/2 cup fresh blueberries
- Fresh mint leaves for garnish
Instructions
- Melt the chocolate chips in a microwave-safe bowl in 30-second intervals, stirring until smooth. Let it cool slightly.
- In a separate bowl, whip the heavy cream, sugar, and vanilla extract until soft peaks form.
- Gently fold the melted chocolate into the whipped cream until fully combined.
- Divide the mousse into serving cups and refrigerate for at least 1 hour to set.
- Before serving, top with fresh strawberries, blueberries, and mint leaves for a refreshing finish.
Mint Chocolate Chip Ice Cream

Mint Chocolate Chip Ice Cream is a refreshing treat perfect for hot summer days. The cool mint flavor combined with rich chocolate chips creates a delightful contrast that is both sweet and invigorating. Plus, it’s surprisingly easy to make at home!
This recipe is simple enough for anyone to try, even if you’re new to ice cream making. With just a few ingredients and a little time, you can enjoy a homemade version of this classic favorite.
Ingredients
- 2 cups heavy cream
- 1 cup whole milk
- 3/4 cup granulated sugar
- 1 teaspoon pure vanilla extract
- 1 teaspoon peppermint extract
- 1/2 cup mini chocolate chips
- Green food coloring (optional)
Instructions
- In a mixing bowl, whisk together the heavy cream, whole milk, sugar, vanilla extract, and peppermint extract until the sugar is dissolved.
- If you want a vibrant green color, add a few drops of green food coloring and mix until you achieve your desired shade.
- Chill the mixture in the refrigerator for at least 1 hour.
- Once chilled, pour the mixture into an ice cream maker and churn according to the manufacturer’s instructions.
- In the last few minutes of churning, add in the mini chocolate chips.
- Transfer the ice cream to an airtight container and freeze for at least 4 hours or until firm.
- Scoop into cones or bowls and enjoy your homemade mint chocolate chip ice cream!
Lemon Basil Sorbet
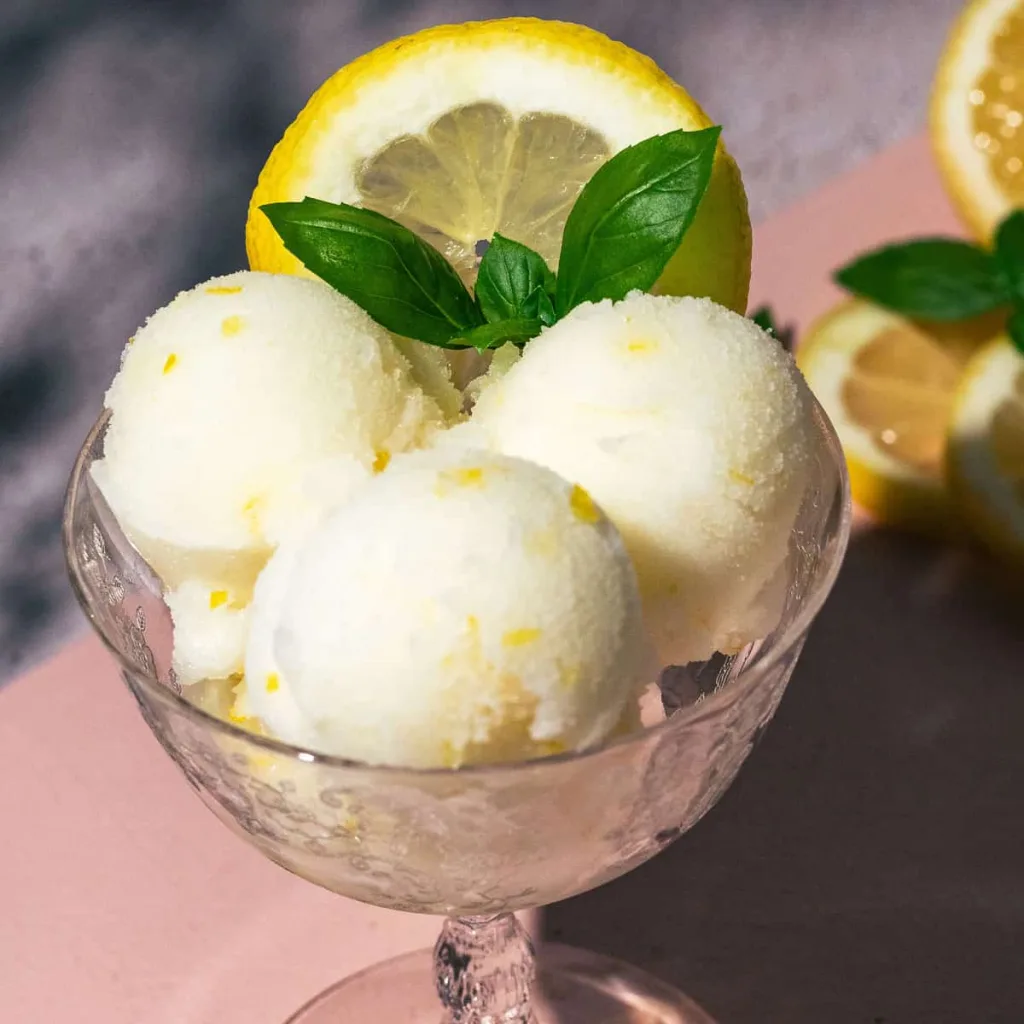
Lemon Basil Sorbet is a refreshing treat that perfectly captures the essence of summer. The bright, tangy flavor of lemon combined with the aromatic notes of fresh basil creates a delightful balance that’s both invigorating and soothing.
This sorbet is simple to make, requiring just a few ingredients and minimal effort. It’s a great way to cool down on a hot day while impressing friends and family with its unique flavor profile.
Ingredients
- 2 cups fresh lemon juice (about 8-10 lemons)
- 1 cup granulated sugar
- 1 cup water
- 1/2 cup fresh basil leaves, packed
- 1 tablespoon lemon zest
- Pinch of salt
Instructions
- Make the Basil Infusion: In a small saucepan, combine water and sugar. Heat over medium until the sugar dissolves. Remove from heat, add basil leaves, and let steep for 30 minutes.
- Strain the Mixture: After steeping, strain the basil-infused syrup through a fine mesh sieve into a bowl, discarding the basil leaves.
- Combine Ingredients: In the bowl with the syrup, add lemon juice, lemon zest, and a pinch of salt. Stir until well combined.
- Chill the Mixture: Refrigerate the mixture for at least 1 hour until it’s cold.
- Freeze: Pour the chilled mixture into an ice cream maker and churn according to the manufacturer’s instructions until it reaches a soft-serve consistency. Transfer to an airtight container and freeze for at least 2 hours to firm up.
- Serve: Scoop the sorbet into bowls and garnish with fresh basil leaves. Enjoy your refreshing Lemon Basil Sorbet!
Peanut Butter Banana Ice Cream
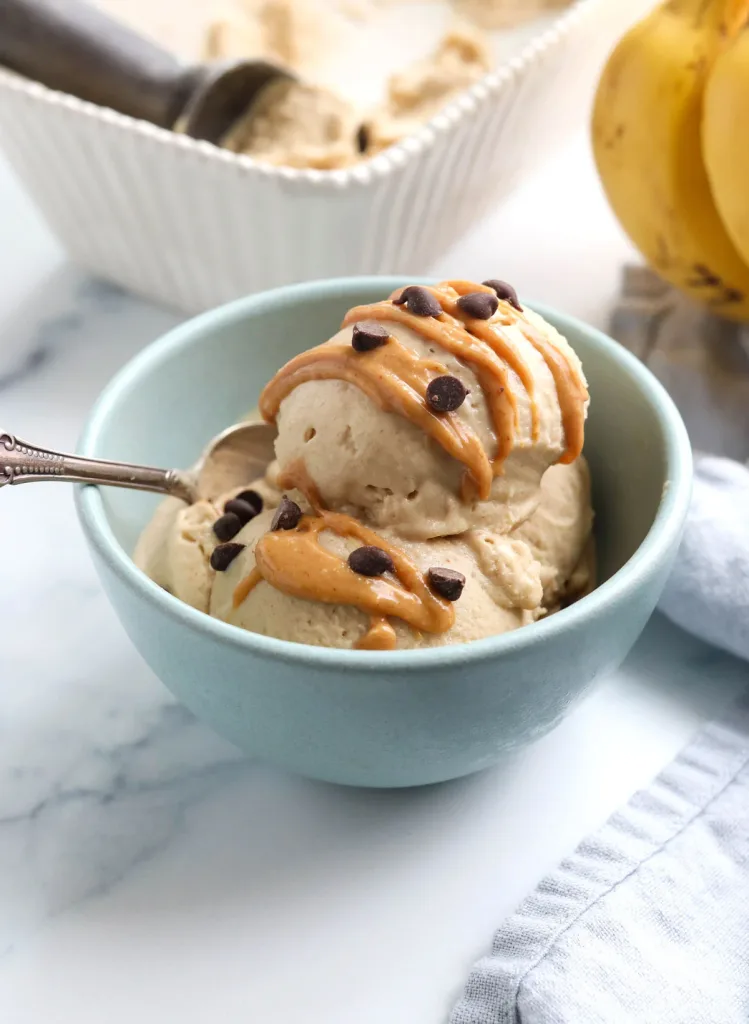
Peanut Butter Banana Ice Cream is a delightful treat that combines the rich flavors of peanut butter and the natural sweetness of bananas. This creamy dessert is perfect for hot summer days and is incredibly easy to whip up at home. With just a few ingredients, you can create a frozen delight that everyone will love.
The taste is a wonderful blend of nutty and fruity, making it a satisfying option for both kids and adults. Plus, it’s a healthier alternative to store-bought ice creams, allowing you to enjoy a guilt-free dessert. Grab your blender, and let’s get started!
Ingredients
- 4 ripe bananas
- 1/2 cup peanut butter
- 1/2 cup milk (dairy or non-dairy)
- 1 teaspoon vanilla extract
- 1 tablespoon honey or maple syrup (optional)
Instructions
- Prepare the Bananas: Peel the bananas and slice them into smaller pieces. Place them in a freezer-safe bag and freeze for at least 2 hours.
- Blend Ingredients: In a blender or food processor, combine the frozen banana pieces, peanut butter, milk, vanilla extract, and honey or maple syrup if using. Blend until smooth and creamy.
- Freeze the Mixture: Pour the mixture into a container and freeze for about 2 hours to firm it up a bit more.
- Serve: Scoop the ice cream into bowls and enjoy! You can drizzle some chocolate syrup on top for an extra treat.
Cherry Almond Galette
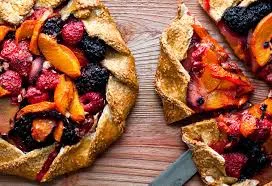
The Cherry Almond Galette is a delightful summer dessert that combines the sweet, tart flavor of fresh cherries with the nutty essence of almonds. This rustic tart is not only delicious but also simple to make, making it a perfect choice for both novice and experienced bakers.
With its flaky crust and juicy filling, this galette is a crowd-pleaser. Serve it warm with a scoop of vanilla ice cream, and you have a treat that captures the essence of summer in every bite!
Ingredients
- 1 1/2 cups fresh cherries, pitted and halved
- 1/4 cup granulated sugar
- 1 tablespoon cornstarch
- 1 teaspoon almond extract
- 1 tablespoon lemon juice
- 1 pre-made pie crust (or homemade)
- 1/4 cup sliced almonds
- 1 egg, beaten (for egg wash)
- 1 tablespoon coarse sugar (for sprinkling)
Instructions
- Preheat your oven to 375°F (190°C).
- In a bowl, combine the cherries, granulated sugar, cornstarch, almond extract, and lemon juice. Toss until the cherries are well coated.
- Roll out the pie crust on a parchment-lined baking sheet. Leave a 2-inch border around the edges.
- Spoon the cherry mixture into the center of the crust, spreading it out evenly.
- Fold the edges of the crust over the cherries, pleating it as you go to create a rustic look.
- Brush the crust with the beaten egg and sprinkle with coarse sugar and sliced almonds.
- Bake for 30-35 minutes, or until the crust is golden brown and the cherries are bubbly.
- Let it cool slightly before serving. Enjoy warm or at room temperature!
Caramel Apple Nachos

Caramel Apple Nachos are a fun and delicious twist on a classic dessert. This treat combines crisp apple slices drizzled with warm caramel, chocolate chips, and crunchy nuts, creating a delightful mix of flavors and textures. It’s a simple recipe that anyone can whip up in no time, making it perfect for summer gatherings or a sweet snack at home.
The combination of sweet and tart apples with rich caramel and chocolate makes every bite a joy. Plus, you can customize it with your favorite toppings, making it a versatile dessert for any occasion!
Ingredients
- 2 large apples (any variety)
- 1/2 cup caramel sauce
- 1/4 cup chocolate chips
- 1/4 cup chopped nuts (like pecans or walnuts)
- 1/4 cup granola (optional)
Instructions
- Prepare the Apples: Wash and slice the apples into thin wedges. Arrange them on a serving plate or platter.
- Drizzle Caramel: Warm the caramel sauce slightly in the microwave for about 15-20 seconds. Drizzle it generously over the apple slices.
- Add Toppings: Sprinkle chocolate chips and chopped nuts over the caramel-coated apples. If using, add granola for an extra crunch.
- Serve: Enjoy immediately while the caramel is warm and gooey!
Lavender Honey Ice Cream

Lavender Honey Ice Cream is a delightful treat that combines the floral notes of lavender with the sweetness of honey. This creamy dessert is perfect for summer, offering a refreshing and unique flavor that will impress your friends and family.
Making this ice cream is surprisingly simple, requiring just a few ingredients and minimal effort. With its smooth texture and aromatic taste, it’s a great way to cool down on a hot day!
Ingredients
- 2 cups heavy cream
- 1 cup whole milk
- 3/4 cup honey
- 2 tablespoons dried culinary lavender
- 1 teaspoon vanilla extract
- 1/4 teaspoon salt
- 3 large egg yolks
Instructions
- Infuse the Cream: In a saucepan, combine the heavy cream, whole milk, honey, and dried lavender. Heat over medium heat until it just begins to simmer. Remove from heat and let it steep for about 30 minutes.
- Prepare the Mixture: Strain the cream mixture through a fine mesh sieve to remove the lavender. In a separate bowl, whisk the egg yolks. Gradually add the warm cream mixture to the yolks, whisking constantly to temper the eggs.
- Cook the Custard: Return the mixture to the saucepan and cook over low heat, stirring constantly until it thickens enough to coat the back of a spoon. Remove from heat and stir in the vanilla extract and salt.
- Chill: Allow the custard to cool to room temperature, then refrigerate for at least 4 hours or overnight.
- Churn: Once chilled, pour the mixture into an ice cream maker and churn according to the manufacturer’s instructions until it reaches a soft-serve consistency.
- Freeze: Transfer the ice cream to a lidded container and freeze for at least 4 hours until firm. Serve with a drizzle of honey and a sprinkle of lavender for garnish.
Orange Creamsicle Cupcakes
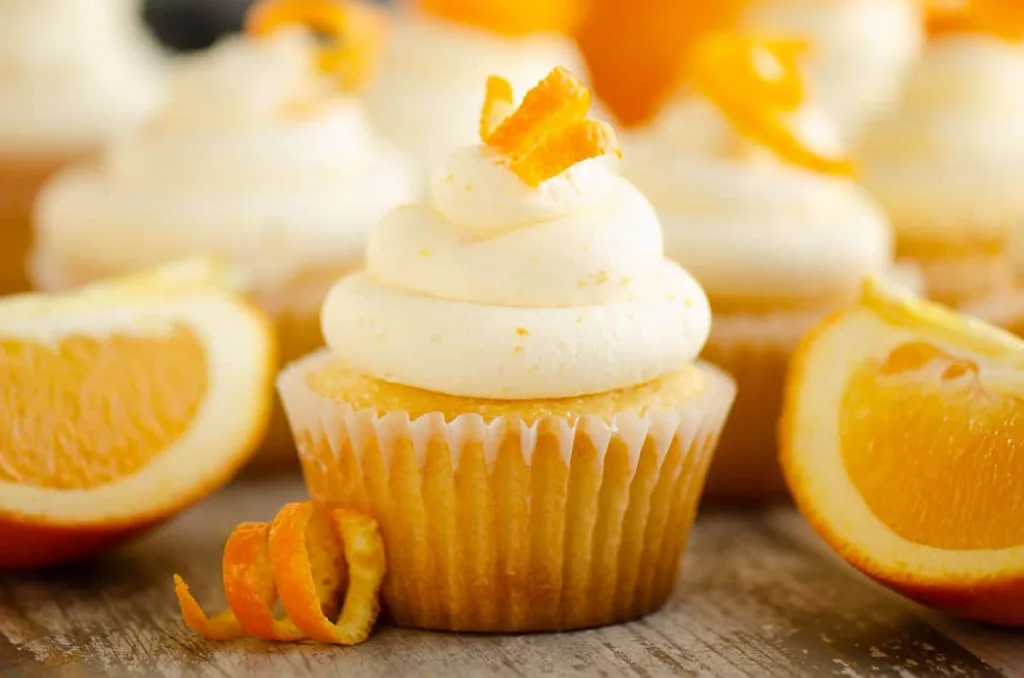
Orange Creamsicle Cupcakes bring a burst of summer flavor to your dessert table. These delightful treats combine the refreshing taste of orange with a creamy frosting, reminiscent of the classic frozen treat. They are simple to make, making them perfect for both baking novices and seasoned pros.
With a light and fluffy texture, these cupcakes are sure to please everyone. The sweet orange flavor paired with the smooth frosting creates a delightful balance that’s perfect for warm days. Plus, they look as good as they taste, making them a great choice for parties or casual gatherings!
Ingredients
- 1 1/2 cups all-purpose flour
- 1 cup granulated sugar
- 1/2 cup unsalted butter, softened
- 2 large eggs
- 1/2 cup milk
- 1/2 cup orange juice
- 1 tablespoon orange zest
- 2 teaspoons baking powder
- 1/2 teaspoon salt
- 1 teaspoon vanilla extract
- 1 cup heavy cream
- 1/4 cup powdered sugar
- Additional orange slices for garnish
Instructions
- Preheat the oven to 350°F (175°C) and line a cupcake pan with paper liners.
- In a large bowl, cream together the softened butter and granulated sugar until light and fluffy. Add the eggs, one at a time, mixing well after each addition.
- Stir in the milk, orange juice, orange zest, and vanilla extract until well combined.
- In a separate bowl, whisk together the flour, baking powder, and salt. Gradually add the dry ingredients to the wet mixture, mixing until just combined.
- Divide the batter evenly among the cupcake liners, filling each about two-thirds full. Bake for 18-20 minutes, or until a toothpick inserted in the center comes out clean.
- While the cupcakes cool, whip the heavy cream and powdered sugar together until stiff peaks form.
- Once the cupcakes are completely cool, frost them with the whipped cream mixture and top each with a slice of orange.